
Sewer line installation is a crucial aspect of ensuring a hygienic and operational household, despite appearing to be a challenging task. Proper installation of a sewer line is important for efficient waste disposal, preventing any unpleasant problems such as backups.
So you might be thinking about how to install a sewer line in the house. Our comprehensive sewer line installation guidelines encompass all the essential stages. It includes planning, excavation, pipe laying and joining, connection to the main sewer line, and thorough testing and inspection.
This guide is perfect for homeowners seeking guidance and DIY enthusiasts who want to understand the process. So stay with us and keep reading.
How to Install Sewer Line in House – Planning and Preparation
Planning and preparation are crucial steps in installing a sewer line in a house. Here are the detailed steps for planning and preparation:
Step 1: Obtain the Necessary Permits
Prior to starting any work on the construction of your sewage line, you must get the required permissions from the local authorities. It’s crucial to verify with your local building authority for precise needs since the rules and regulations differ from one region to the next.
Step 2: Assess the Site
The site’s location, soil type, and terrain dictate the sewage line’s best placement. This entails assessing the site to find the optimal sewage line position and identifying any impediments, such as trees, rocks, or buildings, that may hinder installation.
- To achieve optimum drainage and slope, the sewage line system must also consider soil type and topography.
- Sewer line installation requires well-drained, stable, load-bearing soil.
- Thus, the sewage line should be sloped by at least 2%.
Step 3: Design the Sewer Line System
The site evaluation determines sewage line design. It involves finding the main sewage line, cleanouts, pipe size, type, and slope.
- The main sewage line should be at least 4 inches wide, and the lateral pipes should be 3 or 4 inches. PVC sewage pipes are durable and corrosion-resistant.
- Pipes should slope at least 2% to avoid obstructions and assure flow.
- Likewise, to facilitate sewage line maintenance and inspection, cleanouts should be placed strategically.
- Site evaluation and local construction requirements will help decide where the main sewage line and other components go.
Step 4: Gather the Necessary Materials and Tools
After designing the sewer line system, you need to gather all the necessary materials and tools. Here is a list of materials and tools that you may need to install a sewer line in a house:
Materials
- PVC or ABS sewer pipes (size and length as required)
- Pipe fittings: couplings, elbows, tees, and wyes
- Cleanout assemblies
- Gravel or sand (for backfilling the trench)
- Concrete mix (for securing the cleanout assemblies)
- PVC primer and cement (or ABS glue)
- Trench shoring materials: timber, steel plates, or hydraulic shoring equipment
- Permits and inspection fees
Tools
- Trenching equipment (such as a backhoe or excavator)
- Level or a laser level
- Pipe cutters or saws
- Wrenches or pliers
- Shovels and rakes
- Tape measure and marking tools
- Safety equipment: hard hats, gloves, and safety glasses
- Sewer camera and inspection equipment (optional)
Note that project size and complexity might impact materials and equipment.
Step 5: Notify Your Neighbors
If the sewage line construction would interrupt your neighbors’ routines, tell them. This will avoid installation miscommunications or conflicts.
How to Install Sewer Line in House- Excavation and Pipe Placement
Here is a more detailed and informative guide to the excavation and pipe placement process for water and sewage pipelines:
Excavation process
- Define the excavation site: Use spray paint or other markers to define the excavation site’s limits. It will guarantee that the trench is of the right depth and breadth and that the excavation work is done in the right place. A level or laser level may level the trench.
- Excavate the trench: Excavators or backhoes dig the pipeline trench to the desired depth and breadth. Store the trench dirt nearby for later use. If the trench is deep, use wood, steel plates, or hydraulic shoring.
- Prepare the trench: Remove loose or unstable soil and compress the trench bottom before laying pipes. This will support pipes and prevent trench collapse. Gravel or sand may help support pipes.
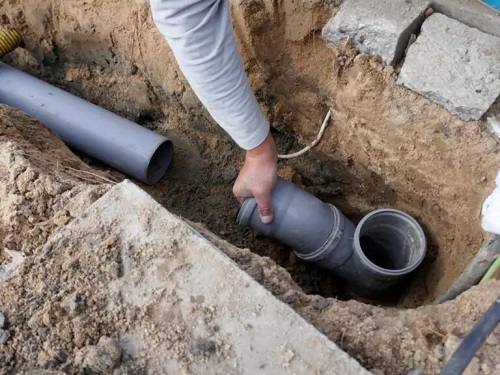
Pipe placement process
- Prepare the pipes: Use pipe cutters or saws and wrenches or pliers to measure, cut, and assemble the pipes. Use PVC primer, cement, or ABS glue to connect the pipes and parts like joints, elbows, tees, and wyes.
- Lower pipes into the trench: A crane or other lifting equipment can place the pipes into the trench once they’re ready. Damage to the pipes during installation might threaten pipeline integrity.
To prevent this, sewer cameras and inspection devices can check pipe alignment.
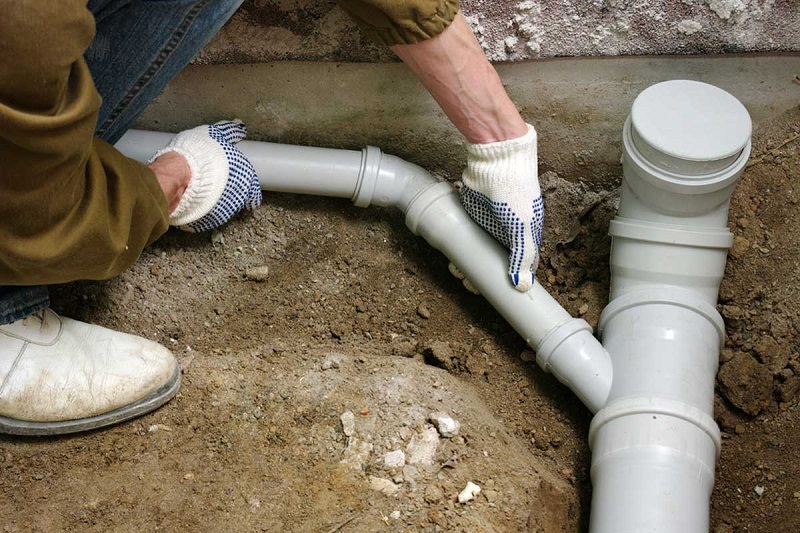
How to Install Sewer Line in House- Laying And Connecting the Pipes in Place
Here comes the main task, which is laying and installing the sewer lines. Be very careful while you follow the following processes.
Laying the Pipes
- Use a crane or other tools that can lift heavy things to lower the pipes into the hole
- Place the lines carefully so that nothing gets broken during the process
- Fittings like joints, elbows, tees, and wyes can be used to connect the lines as needed
- Cut the pipes with pipe cutters or saws and connect them with tools or pliers
- To connect the pipes and fittings, you can use PVC filler, cement, or ABS glue
Connecting the Pipes
- Use fittings and joints to put the pipes in the right place
- Use joints, elbows, tees, and wyes to connect the pipes
- To close the joints and stop leaks, use PVC primer, cement, or ABS glue
- Make sure all the links are properly sealed to stop leaks and other problems
To keep the lines in place, you can use supports or clamps. This will keep them from changing or moving, which could lead to leaks or other problems. Watch this video to see the full process step by step.
How to Install Sewer Line in House- Inspection and Backfill
Inspection before backfilling ensures proper installation and adherence to building codes and regulations. So, let us first discuss how to inspect and then learn about the backfilling process.
Inspection
- After connecting the pipes, contact the local authorities to arrange a pipeline inspection. The installation must pass inspection to comply with local building codes.
- Attend the inspection to answer questions and facilitate a smooth process. The inspector may check the trench, pipes, and other installed components.
- Address any flaws the inspector finds immediately. This may need pipeline repairs or other changes. You must make adjustments to pass the inspection if the installation fails.
After inspection, you may finish backfilling. Keep the inspection report. This will help if there are complications or you sell your property.
Backfill
- Install and test the pipeline before backfilling. Shovel or scrape rubbish and big boulders from the trench. Compact the trench bottom dirt using a compactor.
- Layer gravel or sand in the trench and compress it before adding more. This will condense the backfill and sustain the pipeline.
- Compact the backfill gently. This might damage or move the pipeline. Instead, lightly compress and settle the earth before adding the next layer.
- Refill above ground level with the soil that was dug out of it.
- Finally, smooth the backfilled area using a shovel or rake. Add topsoil or other materials to the surface to restore its look.
How to Install Sewer Line in House- Testing and Cleaning
Testing and cleaning after installing the sewer lines are important. It is described below.
Testing
To guarantee appropriate operation, the pipeline must be tested after installation and backfilling. This will avoid complications and assure pipeline safety.
- Hydrostatic pressure testing is widespread. In this process, the pipeline is filled with water and pressurized above normal operating pressure. Leaks are found and fixed while maintaining pressure.
- Smoke tests are another form. This includes injecting non-toxic smoke into the pipeline and checking for ground or other smoke. This can detect pipeline breaches.
Document and save test findings. This will help if there are complications or you sell your property. Before putting the pipeline into operation, fix any testing concerns. This may need pipeline repairs or other changes.
Cleaning
- Clean the pipeline after installation and testing to eliminate trash and other contaminants
- Hydro-jetting is a popular way to clean pipes. High-pressure water cleans the pipeline and removes debris
- Be careful so that cleaning can not harm the pipeline or other components
- Use the manufacturer’s cleaning instructions and the right tools
- After cleaning, note the findings and retain a copy. This will help if there are complications or you sell your property
Things to Avoid While Installing Sewer Line
When installing a sewer line, there are several things to avoid to ensure a safe and efficient installation:
- Avoid shallow or deep sewer line installation. Traffic and gardening may ruin a shallow line. Maintenance and repair may be difficult if it is too deep
- Don’t let the sewer line make sharp turns or bends. This might create line clogs and pricey repairs
- Avoid mismatches. Use sewer-specific and plumbing-compatible materials
- Avoid constructing sewage lines in flood-prone or high-water zones. This may cause line backups and costly repairs
- Avoid shortcuts during installation. This might cause problems and need expensive repairs or replacements. Install safely and efficiently by following all instructions
Conclusion
Finally, establishing a home sewage line might be difficult, but with the correct equipment, supplies, and expertise, you can do it. This guide will help you build your sewage line securely and quickly, reducing damage, obstructions, and backups.
Always emphasize safety, observe local rules, and contact a certified and experienced plumber with queries. Installing a sewage line properly will help your plumbing system run smoothly and provide you peace of mind for years to come.
Michael
Michael is the owner of Michael's Plumbing. He has experience over 15 years solved thousands of plumbing issues. 100% customer satisfaction made him best in this sector. Finally he decided to share his skills, experience and techniques through this PipesYard blog. Hopefully each and every post of this blog will be helpful for people seeking piping help.