An undeniable charm emanates from a well-designed fireplace or wood-burning stove as you sit by a crackling fire, enveloped in the warm glow. Yet, behind this captivating ambiance lies a crucial component that ensures your comfort and safety – the chimney pipe.
So, how do you install a chimney pipe? In the installation process of a chimney pipe, you need to determine the installation type (roof or wall) and consider clearance regulations. You must cut the ceiling and roof holes, install flashing, set up chimney pipe sections, and secure the storm collar and rain cap.
Continue reading to gain a comprehensive understanding of the entire chimney pipe installation process.
Pre-Installation Preparation
Proper pre-installation preparation is essential to ensure a successful chimney pipe installation. This phase involves:
Assessing Safety and Legal Requirements
Setting safety first and following local laws before beginning the installation process is important. To ensure compliance with the law, check your local building codes, rules, and fire safety requirements.
Gathering Necessary Tools and Materials
These include:
- A Measuring Tape
- Sawzall
- Screwdrivers
- Chimney Pipe Sections
- Tin Snips
- Storm Collar
- Roof Flashing
- High-Temperature Silicone Sealant
- Chimney Rain Pipe
- Ceiling Support Box
- Wood Stove Pipe
Step-By-Step Guide On Installing A Chimney Pipe
Here is a detailed step-by-step guide on how to install a chimney pipe:
Step 1: Identify the Installation Type
The two methods used most frequently to install chimney pipes are through the roof or the wall. The layout of your home, the kind of stove or fireplace you have, and local building codes and regulations will all play a role in this choice.
1. Through the Roof Installation
This type of installation is commonly used when the fireplace is located on the lower levels of a house. It involves passing the chimney pipe through the roof to vent the combustion gasses outside.
2. Through-the-Wall Installation
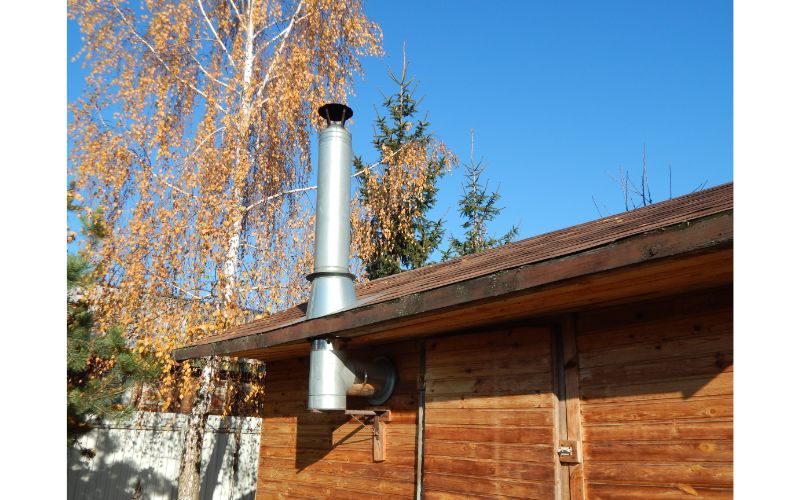
This installation style is appropriate when the stove is on a higher floor. The chimney pipe must be run horizontally through an exterior wall, and the combustion gasses must be vented outside.
The chimney pipe will require appropriate clearances from combustible materials. It might need extra supplies like wall thimbles, wall straps, tee support, and a tee with a cap.
This type of wall installation is very complex and requires a professional to install. So, let’s stick with “through-the-roof installation.”
Step 2: Determine The Number Of Chimney Pipes You Need
To determine how many chimney pipe sections you’ll need is based on the distance between your stove or fireplace and the roof. However, there are other factors you need to consider:
Height Requirements
- The chimney must rise at least three feet above the highest point in the roof where it is a part. This stipulation aids in avoiding downdrafts and ensuring proper drafts for effective venting.
- The chimney must be at least 2 feet higher than any other building component within a horizontal 10-foot radius. This stops combustion byproducts and smoke from being drawn back into the structure.
Extended Roof Bracket
An extended roof bracket must be installed for stability against wind and snow loads if the chimney pipe rises above 5 feet above the roof. The extended roof bracket supports the chimney pipe and lessens excessive swaying or movement.
Joint Overlap
The overlap of tight-fitting joints must be considered when determining the installed length of the chimney. There will be a specific overlap requirement for every joint in the chimney pipe sections, usually specified by the manufacturer.
To ensure a proper fit and secure connection, deduct the required length for each joint from the total chimney height.
Step 3: Locate The Center Point And Make A Cut
Consider the required clearances from combustible materials when determining the center point for the chimney pipe penetration. Single-wall chimney pipes typically require a minimum distance of 18 inches from combustibles.
Mark And Cut The Ceiling
Once you’ve found the center, mark the ceiling with the ceiling support box. Place the ceiling support box in the center, then trace a circle around it on the ceiling. This plan will act as a direction for cutting the hole.
The ceiling support box is designed to provide structural support and proper alignment for the chimney pipe. It typically comes with two brackets for mounting to the ceiling joists. Use a Sawzall to cut along the ceiling’s drawn outline carefully.
Step 4: Locate Where To Make A Cut On The Roof And Make The Cut
After cutting a hole in the ceiling, you must locate where the pipe will pass through the roof and make a corresponding cut.
Measure And Mark The Location
Find the hole in the ceiling of your house where the chimney pipe will exit. Select a piece of single-wall stove pipe that is long enough to connect the hole in the ceiling to the hole in the roof, ensuring it is parallel to the hole below.
The stove pipe section should be perfectly vertical, so place a level on top of it to check. Mark the spot on the roof where the pipe top touches the material while holding the stove pipe section in place. As a cutting guide, this mark will be used.
Mark The Hole On The Roof
Based on the mark made with the stove pipe, mark the center of the roof with chalk or a marker. Consider putting a screw through the roof deck where it has been marked for easier identification. Cutting the hole on the roof side will serve as a clear and concrete reference point.
Cut The Hole On The Roof
Pick up your adjustable roof flashing and position it in the center of the screw you inserted through the roof deck. The flashing over the roof’s marked spot will act as a stencil. The outline of the hole you need to cut will be visible on the roof shingles after you spray paint inside the flashing.
To make the hole in the roof, carefully cut a Sawzall along the spray-painted outline. To ensure precise and clean cuts, strictly adhere to the marked line. Ensure that nothing falls into the attic or the living space below, and clear the area of any cut roofing material and debris.
Step 5: Install Roof Flashing
Roof flashing is an essential component providing a waterproof seal around the penetration of the chimney pipe. It prevents water from entering the roof structure.
Position the Flashing
Place the roof flashing over the hole, ensuring to encircle the area where the chimney pipe is pierced completely. Set the flashing up so the hole’s edges are covered and flat on the roof.
Secure the Flashing
Screws or roofing nails should be used to fasten the flashing. To prevent harm to the roofing material, ensure the flashing is firmly fastened to the roof, but take care not to overtighten the fasteners.
Apply a Waterproof Sealant
Apply a high-temperature silicone sealant around the edges of the flashing where it meets the roof surface. This sealant helps to form a watertight seal and adds a layer of protection against water penetration.
Inspect the Flashing
Carefully examine the installed flashing to ensure it is properly positioned and securely fastened. Check for gaps or areas that require additional sealant or adjustments to ensure a tight seal.
Step 6: Set Up The Chimney
This involves connecting the appropriate sections of the chimney pipe to create a continuous venting system from the stove or fireplace to the exterior of the building.
Measure the Inner Diameter of Your Chimney
Measure the inner diameter of your chimney to ensure you select the correct size of chimney pipe sections. The inner diameter should match the size of the stove pipe.
Select the Chimney Pipe Sections
Depending on the kind of chimney and how it will be installed, choose the appropriate chimney pipe sections. The typical lengths of chimney pipe sections range from 12 to 24 inches or even longer. Ensure the sections are appropriate and created for the particular fuel type (wood, gas, pellets, etc.).
Connect the Chimney Pipe Sections
Find the chimney pipe’s area with the male end that has recessed insulation first. Install the universal pipe adapter to the male end of the chimney pipe with sheet metal screws. This ensures a smooth transition from this area to the single-wall pipe.
Bring Down the First Section of the Pipe
First, carefully lower the chimney pipe through the roof flashing and support box. The pipe should be inserted smoothly after lining up with the flashing and support box’s hole.
Step 7: Put in the Storm Collar and Rain Cap
These components protect against weather elements and help prevent water from entering the chimney system.
Install the Storm Collar
The storm collar is a metal collar that fits around the chimney pipe. The storm collar should be positioned above the flashing and slid over the chimney pipe. Ensure the storm collar forms a tight seal around the chimney pipe, blocking potential water infiltration. To keep it in place, use silicone.
Attach the Rain Cap
The rain cap is a protective cover over the chimney pipe’s top. Place the rain cap over the chimney pipe, ensuring it fits securely. Use a 5/16 nut driver to secure the rain cap on the pipe.
Step 8: Secure The Chimney Pipe
Ensure that the chimney pipe sections are properly aligned and straight. Avoid sharp bends or offsets in the chimney pipe, as they can disrupt the airflow and cause drafting issues. Use a level or plumb line to check for vertical alignment of the chimney pipe.
Secure the chimney pipe sections using appropriate support brackets and braces. Make sure that the chimney pipe is adequately supported and stable.
Install Stovepipe
The stovepipe connects the stove or fireplace to the chimney pipe so that combustion gasses can be properly vented. Ensure the male end of the chimney pipe points down to fit into the stovepipe snugly.
On the other hand, the stovepipe should be 25% smaller than the size of the stove flue. With this configuration, creosote will fall back into the stove instead of dripping from the pipes. The stovepipe can be fastened to the stove or fireplace outlet using screws. Ensure the connection is tight and stable to avoid leaks or dislodging.
Step 9: Install A Trim Collar
Aligning the trim collar with the opening, place it over the ceiling support box. Ascertain that the collar fits straight and fills the space between the support box and the ceiling. Attach the trim collar to the support box with the supplied screws or fasteners.
Put the screws in the support box through the collar’s holes. Set the torque setting appropriately to avoid over-tightening and damage when using a drill. Here is a video to help you out.
Most Common Questions
Here are other related questions about this topic.
Q1: What common problems can occur with chimney pipe installations?
Several common issues can arise with chimney pipe installations if not done correctly. These problems include improper sealing or insulation, chimney leaks, and creosote buildup. These issues can lead to reduced efficiency, poor ventilation, increased fire hazards, and compromised structural integrity.
Q2: Why is the through-the-roof method preferred to through-the-wall in installing chimney pipes?
It is preferred because it allows for better vertical venting and improved draft. The through-the-roof method raises the chimney’s height and improves the natural upward flow of smoke and gasses.
Q3: What is the 3 2 10 rule for stove pipe?
The rule states that the stove pipe should have a minimum clearance of 3 feet above the roof, 2 feet higher than any building within 10 feet.
Conclusion
Proper chimney pipe installation is vital for safely and efficiently operating your fireplace or wood-burning stove. Following the expert guidance in this comprehensive guide, you can confidently navigate each installation stage.
Adhering to clearance requirements and local building codes is crucial for maintaining safety and compliance. Remember to consult manufacturer instructions and seek professional assistance, especially if you need more clarification or experience.

