Brazing is a process of joining two metal parts together by heating them to a temperature above 840°F (450°C) and melting a filler metal into the joint. This creates a strong and durable bond between the two parts. Learning how to braze copper pipes can save you time and money on expensive repairs.
The brazing process involves heating the joint area with a torch, applying a brazing alloy, and allowing it to flow into the joint area. This allows the alloy to create a strong and reliable joint. Afterward, you will need to leave it to cool down naturally.
Of course, there are distinct techniques to be applied for each step. Keep reading to learn more.
Understanding the Materials and Tools
In this section, we will discuss the materials and tools required for brazing copper pipes.
Introduction to Copper Pipes and Brazing Materials
Copper pipes are widely used for water supply systems and HVAC systems due to their durability and excellent heat conductivity. However, these pipes need to be joined to create a continuous plumbing system, and this is where brazing comes into play.
In the case of copper pipes, a brazing alloy is melted into the joint area to join the pipes. The brazing alloy is chosen based on the type of application and the materials being joined.
Types of Brazing Alloys and Fluxes
Several types of brazing alloys can be used for copper pipes, including silver-based alloys and copper-phosphorus alloys.
Silver-based alloys are commonly used for copper pipes because they provide a strong and leak-free joint. Copper-phosphorus alloys are used for HVAC systems where higher temperatures are involved.
Flux is a chemical compound used to clean and prepare the joint area for brazing. It helps to remove any surface oxides and contaminants from the joint area, allowing the brazing alloy to flow easily and create a strong bond. There are several types of fluxes available, including liquid and paste fluxes.
Tools Needed for Brazing Copper Pipes
To braze copper pipes, you will need several tools. Here are some of them.
- Brazing torch
- Brazing rods
- Flux
- Wire brush
- Pipe cutter or hacksaw
- Pipe reamer or emery cloth
- Pipe fittings
Preparing the Copper Pipe
Let’s discuss the steps to prepare the copper pipes for brazing.
Cleaning and Deburring the Pipe
Before brazing, cleaning and deburring the copper pipes is essential to ensure a strong and leak-free joint. To do this:
- Step 1: Use a wire brush or emery cloth to clean the outside of the copper pipe.
- Step 2: Remove any burrs or sharp edges from the cut ends of the copper pipe with a pipe reamer or emery cloth.
- Step 3: Utilize a deburring tool or sandpaper to smooth any rough edges or sharp points inside the pipe.
- Step 4: Use a clean rag or paper towel to remove any dirt, dust, or debris from the surface of the copper pipe.
Proper Fitting and Alignment
To ensure a strong and leak-free joint, it is important to fit and align the copper pipes correctly before brazing. To do this, follow the following steps.
- Step 1: Ensure that the copper pipes are cut to the correct length.
- Step 2: Use a pipe cutter or hacksaw to make any necessary cuts.
- Step 3: Use a pipe fitting to connect the copper pipes together.
- Step 4: Ensure that the pipes are properly aligned and flush against each other.
- Step 5: Check for any gaps or misalignments and make adjustments as necessary.
Applying Flux to the Joint Area
Once the copper pipes are properly fitted and aligned, it’s time to apply flux to the joint area. To apply flux, follow the following steps.
- Step 1: Use a small brush or applicator to apply a thin layer of flux to the joint area.
- Step 2: Ensure that the flux covers the entire joint area.
- Step 3: Avoid applying too much flux, as this can cause the brazing alloy to flow unevenly.
- Step 4: Allow the flux to dry completely before proceeding to the brazing process.
How To Braze Copper Pipe?
Here, we will look at all the steps involved in the brazing process of copper pipes.
1. Setting Up the Brazing Equipment
In this section, we will discuss the steps to set up the brazing equipment.
- Setting up the brazing torch: A brazing torch is a crucial tool for brazing copper pipes. To set up the brazing torch:
- Ensure the fuel source (propane, acetylene, or MAPP gas) is securely attached to the torch.
- Check the source for any leaks before use.
- Put on protective gear such as gloves, safety glasses, and an apron to protect yourself from the heat and sparks.
- Adjust the torch tip to the appropriate size for brazing copper pipe.
- Attach the brazing rod to the torch.
- Adjusting the flame and heat: Proper flame and heat control are essential for successful brazing. For this:
- Light the torch and adjust the flame to a low or medium setting.
- Position the flame directly over the joint area.
- Slowly increase the heat until the brazing rod begins to melt.
- Adjust the flame as necessary to maintain the correct temperature for brazing.
2. Brazing the Copper Pipe
Now let’s move to the actual brazing process.
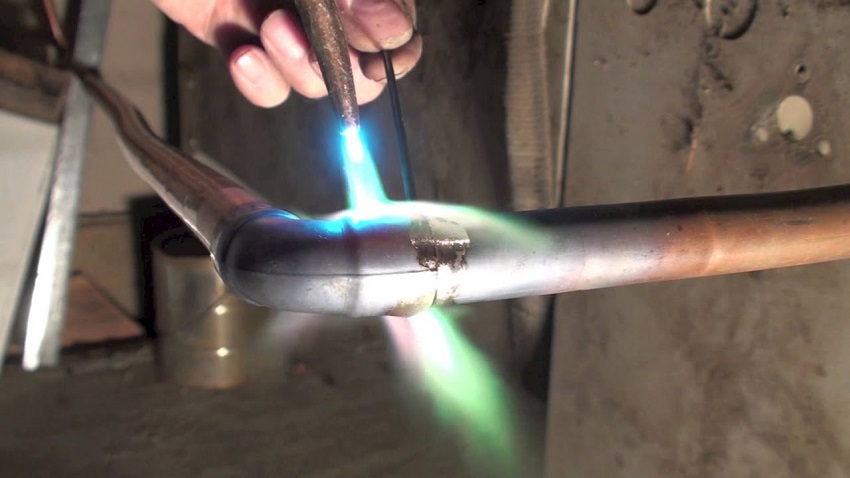
- Applying heat to the joint area: To begin brazing the joint:
- Hold the torch at a 45-degree angle to the joint, with the flame directly over the joint area.
- Heat the joint area evenly, moving the flame around in a circular motion.
- Heat the joint area until the brazing flux begins to bubble and turn brown.
- Ensure that the heat is evenly distributed around the joint.
- Applying brazing alloy to the joint: Once the joint area is heated sufficiently:
- Touch the end of the brazing rod to the joint area.
- Allow the brazing alloy to melt and flow into the joint area.
- Continue to heat the joint area to ensure that the brazing alloy melts evenly and flows into the joint.
- Avoid overheating the joint, as this can cause the brazing alloy to melt unevenly or flow out of the joint.
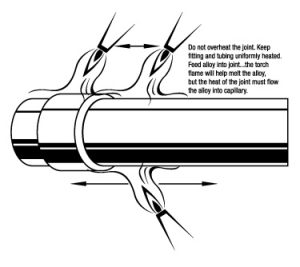
Techniques for brazing the joint: When brazing the joint, it is important to use proper techniques to ensure a strong and leak-free joint. Some techniques to keep in mind include:
- Avoid moving the joint area while the brazing alloy is still molten, as this can cause the joint to weaken or fail.
- Use the appropriate amount of brazing alloy for the joint size.
- Allow the joint to cool slowly to prevent thermal shock, which can cause the joint to crack or fail.
- Check the joint for any leaks or defects after brazing.
- If there are any leaks or issues, reheat the joint and add more brazing material as necessary.
- Use a wire brush or sandpaper to remove any excess brazing material around the joint.
You can watch this video to better understand the process.
Safety Precautions
Here are some safety precautions that need to be taken while brazing welding copper pipes:
Wear Protective Clothing
Wear protective clothing such as gloves, a welding helmet, and a flame-resistant jacket to avoid burns and other injuries. Leather gloves and sleeves are particularly useful in protecting your hands and arms from the hot metal.
Ensure Proper Ventilation
Ensure proper ventilation in the workspace, as the welding process can produce fumes and gas that can be harmful to your health. Working in a well-ventilated area will prevent you from inhaling toxic gasses.
Keep a Fire Extinguisher
Keep a fire extinguisher nearby to extinguish any fire that may accidentally start. It is also essential to have a fire blanket to smother any flames on your clothes or workspace.
Keep the Workspace Clean
Keep your workspace clean and clear of any flammable materials. Clear away any debris or clutter that may catch fire.
Check Your Equipment
Ensure that your welding equipment is in good condition and well-maintained. Faulty equipment can cause accidents and injury. It is crucial to check and maintain your equipment to prevent any accidents regularly.
Be Cautious of Hot Metal
Be mindful of the hot metal, as it can cause severe burns. Use tongs or pliers to handle hot metal.
Frequently Asked Questions
Here we will answer some more questions related to brazing copper pipes.
- Can I braze copper pipe if it’s wet or damp?
Ans. No, it’s important to ensure that the copper pipe is completely dry before brazing. Otherwise, this may bring any unwanted accidents.
- What is the difference between brazing and soldering?
Ans. Brazing and soldering are both methods for joining metal parts together. However, brazing uses a higher temperature and a different type of filler metal than soldering.
Conclusion
With practice and patience, you can master the art of brazing and confidently tackle any plumbing repair project. If you have the right tools, materials, and techniques, you can learn how to braze copper pipes like a pro.
Follow the manufacturer’s instructions when using brazing equipment and materials. Pay proper attention to all the steps mentioned in this article to achieve the best possible result. If you are unsure, get professional help.
Michael
Michael is the owner of Michael's Plumbing. He has experience over 15 years solved thousands of plumbing issues. 100% customer satisfaction made him best in this sector. Finally he decided to share his skills, experience and techniques through this PipesYard blog. Hopefully each and every post of this blog will be helpful for people seeking piping help.